
Monday, January 27, 2014
What's in the box: Execution Rocks by FOS Scale Models
Want to a peek at what is inside of $600 plus kit? Here it is. Interestingly, I haven't seen any builds of Execution Rocks yet. There have been at least two right after release of Red Hook. However, since then its price on eBay reached almost $1500. I suspect not many are willing to start their kits which potentially may be worth that much.
Sunday, January 19, 2014
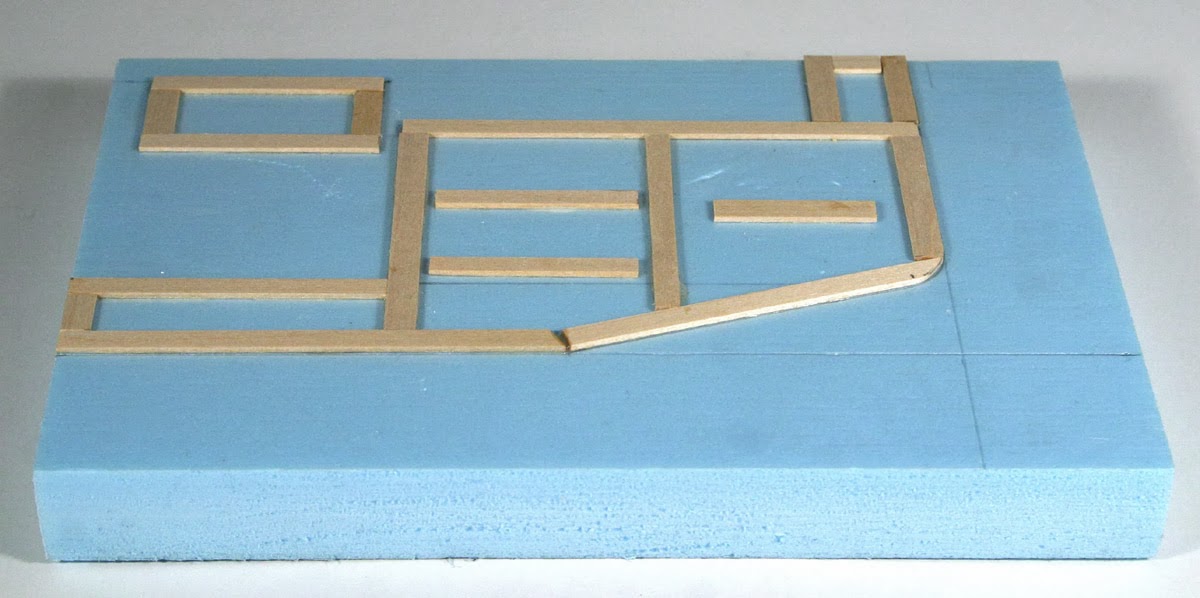
Project Update: The Magic Shop by FOS Scale Models
All right here comes yet another project. The reason I started it was because I had nothing to work on during my lunch breaks. Everything I had at the time required home workbench setup. Actually story goes few months back. I prepared parts for it few months ago during my extra modeling time I found sometime in August of 2013. I didn't get the kit when it originally came out. Several attempts to buy it on eBay didn't work out until sometime in the fall of 2013. When I received I realized that it had heavy smoke smell. I couldn't take it home and put on the shelf in my modeling room. The smell would have been unbearable. Good thing parts didn't have a chance to absorb all the smoke. In addition the kit had been started. Not much progress had been made only windows and doors had been cut off of sprue and storefront parts had been removed from their sheets. A little later I realized that some windows had been misplaced and some replaced with ones of wrong size. That led to purchase of wrong windows. I should have checked openings in the walls instead relying on the windows I found in the box. Anyway after preparing parts I put them on the shelf until I can dedicate more time. The opportunity opened up couple of weeks or so ago.
It took me some time to figure out painting scheme. Then I remembered FSM Skinner's row. One of the buildings there is painted in three colors. Most of the time I try to avoid more than two but this structure was calling for something special. Skinner's instructions call for Floquil paints. I only had one color and with Floquil basically gone I had to find substitutes. I also didn't want to mix Floquil and acrylics. I have quite extensive collection of craft paints so the task wasn't extremely difficult. I had to guess green though. I had nothing to compare against. I think I did well. After painting all walls and windows I see that all colors working together. I will have to put this project on back burner soon though. I received a kit to build yesterday so it will take priority. It is quite large kit so it may be awhile before I'll have any update on this project.

It took me some time to figure out painting scheme. Then I remembered FSM Skinner's row. One of the buildings there is painted in three colors. Most of the time I try to avoid more than two but this structure was calling for something special. Skinner's instructions call for Floquil paints. I only had one color and with Floquil basically gone I had to find substitutes. I also didn't want to mix Floquil and acrylics. I have quite extensive collection of craft paints so the task wasn't extremely difficult. I had to guess green though. I had nothing to compare against. I think I did well. After painting all walls and windows I see that all colors working together. I will have to put this project on back burner soon though. I received a kit to build yesterday so it will take priority. It is quite large kit so it may be awhile before I'll have any update on this project.
Saturday, January 18, 2014
Project Update: Texaco Gas Station by Micro-scale Models
While posting pictures yesterday I noticed that they had slight lemon yellow tint to them. I have been using same light setup and custom white balance for quite some time. Then I realized it must have been new goose-neck LED lamp I bought at IKEA couple of weeks ago. I think it was on at the time I was taking pictures. I bought the lamp to give me some more light in my work area. I wanted stronger light but I couldn't justify the price of bigger fixture. I found this small light that was producing quite strong light for its size. It isn't big enough to light entire workbench but is very good for spot lighting. Apparently the light is strong enough to mess with my pictures though.
The gas station is making baby steps but is surely moving forward. I could swear I had somewhere a file with scanned enlarged Texaco signs. I couldn't find it anywhere. Anyway I repeated the process yesterday and printed the signs. Now I have to weather them and glue over existing ones. I have mentioned why I want to do this in one of the earlier posts but I don't want to make anyone go back and look for it. Basically, dry transfer signs don't weather well. Anything I use just runs off without staining them. The signs look too new. Therefore I am replacing with ones. To make sure they completely cover old signs I have enlarged them a little.


The gas station is making baby steps but is surely moving forward. I could swear I had somewhere a file with scanned enlarged Texaco signs. I couldn't find it anywhere. Anyway I repeated the process yesterday and printed the signs. Now I have to weather them and glue over existing ones. I have mentioned why I want to do this in one of the earlier posts but I don't want to make anyone go back and look for it. Basically, dry transfer signs don't weather well. Anything I use just runs off without staining them. The signs look too new. Therefore I am replacing with ones. To make sure they completely cover old signs I have enlarged them a little.
Friday, January 17, 2014
Project Update: Ideal Hosiery by FOS Scale Models
Doug Foscale has announced few days ago that he is releasing new kit which can be used as companion to Ideal Hosiery. Had he released a little bit earlier I could have incorporated them both into one diorama. On another note I better keep things simpler. This way I get projects finished. Canal and Third is good example. It is complex and big and is sitting on the shelf and waiting for its turn which may never come.
Anyway, I was about to declare the IH kit finished but then while taking pictures I noticed that I forgot to weather the chimney. Beside dusting chimney with soot I need to add more roof details. I will do that later after I determine what castings and figures I will use on diorama. Then I will paint them all at once.
Couple of days ago I started making diorama base. Like in most cases I glued 1/16" thick strips of basswood to allow some room for sculptamold and lightweight spackle. Actually I applied both yesterday since they both are separated by sidewalks. Most of the time they come into contact so I apply sculptamold first and then spackle once sculptamold has dried. In case if anyone is curious sculptamold is for land and spackle for road. The latter sands very well allowing to get very smooth surface. Also The potholes can be created by picking pieces with a tip of X-Acto blade. Sculptamold is bumpy and isn't easily sandable.
Wednesday, January 15, 2014
Project Update: Texaco Gas Station by Micro-scale Models
Do you remember this guy? It is been awhile since I have posted anything on it and I don't remember what was it all about. Therefore I apologize if I will repeat myself.
The main reason I put this project on back burner was that I needed to use posts for canopy from detail kit instead of tubing that came with original kit. The posts turned out to be too short. At first I toyed with an idea of raising the pump base up. That would have made it unrealistically high. I could have extended posts with stripwood but that would have required some tapering, sanding, repainting. I just didn't want to do that much work. Therefore I have decided to use round styrene for the extension. I was able to paint and weather extension pieces separately and then I glued them on top of the posts.
The plaster base needed some modification as well. Since I needed to use the pump base from detail kit the one that was molded in had to go. I had to put a little more work into it than I expected though. The plaster used for the base appeared to be a little more tougher than Downtown Deco or RailroadKits.com hydrocal kits are made of.
With these tasks completed it seems all I have left is straight run to the finish line.


Tuesday, January 14, 2014
Project Update: Ideal Hosiery by FOS Scale Models
The beginning of 2014 has been slow for me as far as modeling goes. That is driving me nuts but circumstances aren't favorable at the moment. Anyway, I have managed to make some progress. I am adding a little shed to the project. It still needs some work but is really close to be finished as well as the main building that is missing roof access hatch.
I played a little with diorama layout past Sunday. It seems I need a tree. I have those great books on tree making but wire twisting and subsequent work are very time consuming. Maybe next time. For the time being I will use same armature I used to make tree for Houligan's Alley diorama. It turned out better than I expected. The armatures are identical and for that reason making entire forest wouldn't be great idea but as for single tree it works very well.


I played a little with diorama layout past Sunday. It seems I need a tree. I have those great books on tree making but wire twisting and subsequent work are very time consuming. Maybe next time. For the time being I will use same armature I used to make tree for Houligan's Alley diorama. It turned out better than I expected. The armatures are identical and for that reason making entire forest wouldn't be great idea but as for single tree it works very well.


Friday, January 3, 2014
Project Update: Gritty McDuff's by Bar Mills
Although it is 2014 already I am stepping back into 2013. I finished McDuff's on Christmas Eve but because of Christmas, trip to the mountains, and the New Year I didn't have a chance to take final pictures and do writeup.
I finished first three buildings without any issues. The red one apparently had problem with second floor doors originally. They were the size of first floor i.e. too small My kit came with correct replacement in separate bag so I didn't have to contact Bar Mills and get problem resolved. The last building had the same laser calibration issue just like Raglan Road. I didn't notice the fact until I started gluing wall parts together. Good thing I figured that before glue had chance to set. I took everything apart and adjusted the walls to make all angles square. The process involved cutting and sanding so no surprise I ended up having a gap between two of the walls. I filled the gap with a piece of 1/16 stripwood. It is noticeable but that side will go against the wall of the main building so it won't be visible. Had I been building for myself I wouldn't have used any filler at all. Since it isn't my kit I needed to make it presentable.
On another note I didn't finish the Gas Station. That makes number of finished kits in 2013 equal to the total of 2012. 2014 I am sure will be different since I am going through some period of uncertainty. Therefore, I am not sure if I'll get done more or less.


Subscribe to:
Posts (Atom)