
Monday, June 18, 2012
What's in the box: Switching Tower & TS by Railroadkits.com
For today's topic I have yet another hydrocal kit by Railroadkits.com.

Wednesday, June 13, 2012
Project Update: Truck Stop kitbash based on EF13B by RailroadKits.com
I have agreed to make couple of display dioramas for Jimmy Deignan. They are based on two of his Ed Fulasz line hydrocal kits EF13B and EF13C. Originally they have been designed as Used Car Lots. Jimmy had his ideas how to modify them. I have chipped in as well and we have come up with the Truck Stop with restaurant addition and some quite intricate sign. This is what brick structure will become. Jimmy thinks I should do the same with cinder block building. That would be easy way out but I want to do something different. However, so far I have not been able to come up with any kind of idea. I hope pending vacation and trip to Chicago will help me in that. For time being I am concentrating on brick version.
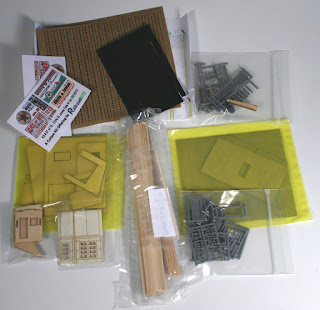
I haven't done "What's in the box" so here it is the content of the box.

Next is my tool for sanding backs of the hydrocal castings. It is simply a sheet of sandpaper glued to a tile. I used white glue here. When time comes to replace the sandpaper I will soak the tile in the water and peel sandpaper off. I have used the tool on four kits already and I will be able to do one more.

After sanding casting backs I do some weathering. Ed Fulasz produces very nice patterns of pristine brick and that gives more options for builders. Structure can be built as is nice and new or it can be modified to add age and character. And this is exactly what I like to do. I chip off some brick, add cracks, brush it with wire brush.


Then I proceed to gluing. I am using 5 min epoxy. I have used wood glue once but I am not going that route anymore. I like two types of epoxy, Ace Hardware brand that comes in two separate metal tubes and more expensive modeling epoxy that I bought at Hobby Lobby. Latter comes in two plastic bottles with dispenser tips which allow to dispense small amounts what in many cases is all that is needed. Therefore, more expensive becomes not that expensive because very little is wasted. I glue bracing at this time as well. I think I have used more bracing than it was intended here but then there is no such thing as too much of it.


The gaps between castings are practically unavoidable. Some people leave them and later cover them with scenery material or pipes. I like filling them in. It doesn't take much effort anyway. I put two pieces of masking tape on each side of the gap and rub spackle in. I use lightweight. It has has lower content of water and it doesn't crack. I didn't do it on brick building but I suggest removing masking tape right away and smoothing seam instead of letting it to dry and then sanding. After spackle is dry I scribe mortar lines into it.


I won't go into details how I do painting. Randy from Downtown Deco has a tutorial on it. I pretty much follow his recommendations with some variations of my own. In this case I have attempted to do mortar lines. However, last application of row umber wash covered or washed them out somewhat. I liked the effect so I decided not to redo the lines.


The proposed look of the truck stop is shown in pictures below. At the moment I am waiting for scribed siding and windows that I ordered through local train store as well for some laser cut parts that Jimmy is producing.


Monday, June 4, 2012
What's in the box: Gas N Go by Railroadkits.com
I thought about posting project update today but don't have time to do a write up. Therefore, I am presenting content of personalized Gas N Go kit. The name of it is based on my son's. Well, he has non English name so I couldn't use it but quite often people make first and middle out of his first name. I used that to personalize my kit. By the way, I haven't shown it to my son yet. I bet he will say I am a nerd.

Friday, June 1, 2012
What's in the box: City Coal and Fuel by Railroadkits.com
Next up is City Coal and Fuel. It is hydrocal Ed Fulasz line kit. I like the coal piles.


Subscribe to:
Posts (Atom)